Google Tag Manager is a tool that is over a dozen years old, yet relatively little known compared to other products of the American giant, such as Google Ads or Google Analytics.
Meanwhile, it's incredibly useful for managing website code, especially if you don't have programming knowledge. How does it work and when might it be useful?
What is Google Tag Manager?
Google Tag Manager is a tool that allows you to easily add, remove, or modify scripts (also known as tags) to your website. In other words, it allows you to manage all the tags you need in one place to more effectively analyze website data, improve conversions, track traffic sources, and more.
Using GTM, we don't have to directly modify the website's code every time we want to implement a new script. It acts as a middleman, eliminating the need to hard-code any tags, which would burden and slow down the site. It also allows us to avoid errors that can occur when trying to implement a tag manually.
(The rest of the article can be found below the form)
Over time, we're adding more and more tags to websites. The most popular include the Google Analytics tag, which allows us to collect data on website traffic and conversions, the Facebook pixel, which allows us to measure the effectiveness of ads, and the Google Ads remarketing tag.
However, there are also many other scripts useful from a marketing perspective. Thanks to GTM, we don't have to manually place them all on the website – we simply implement the Google Tag Manager code once, and all other tags can be implemented through it.
How exactly does Google Tag Manager work?
From a marketing perspective, Google Tag Manager acts as a middle layer between your website and all the analytics and advertising tools you use – from Google Analytics and Google Ads to the Meta Pixel, CRM code, and heat map tools.
Instead of adding each code separately in the CMS or template files, you only need to introduce the GTM container to the website and the rest can be managed in a convenient panel.
Each time the page is called up, the GTM container is loaded first and "checks" whether specific tags should be triggered on a given subpage or for a given user behavior based on configured rules and triggers.
This allows for precise control over which scripts are run, when, and with which parameters, resulting in improved data quality and greater flexibility in campaign optimization. It also complies with data processing directives and Consent Mode.
How is Google Tag Manager structured?
In Google Tag Manager, the highest level of the structure is the account —it's where all the smaller subsets in the tool are gathered. Within an account, we can create containers —figuratively speaking, separate boxes for collections of tags.
Each container has its own code for implementation in the page's codebase. Once implemented, the entire set of tags contained within it becomes active on the page.
The tag itself is a type of tracking code that, once installed on a website, begins collecting data – this may include information about traffic, conversions, etc. – depending on the type of tag.
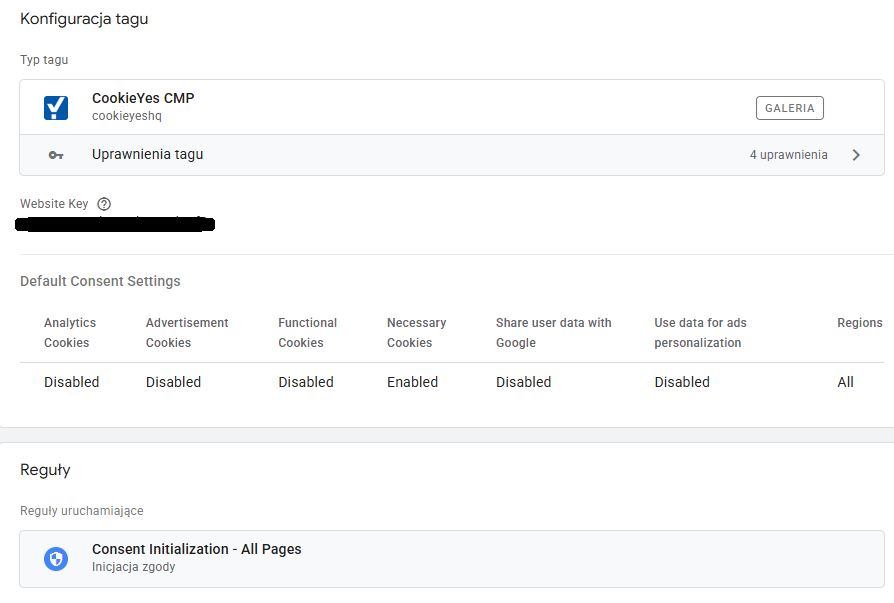
Each tag should have a rule assigned to it that specifies when the script should fire – we can add a rule stating that the tag should fire on all subpages or only on some of them – for example, when measuring conversions, we will assign a rule stating that the script should collect data only from the purchase confirmation page.
Fig 1. Example of a tag added in Google Tag Manager.
GTM Tags, Rules and Triggers
So let's sort out the basic concepts that appear in the context of Google Tag Manager:
- Tags in GTM (tags) are code fragments or ready-made templates that send data to external tools, for example Google Analytics, Google Ads, marketing automation systems, or A/B testing tools. The tag can be responsible for measuring page views, events (e.g., button clicks), e‑commerce transactions, or sending page scrolling data.
- Rules and triggers specify when a given tag should be fired, e.g. on all pages, only on the thank you for a purchase page, only when a specific element is clicked, after completing a form, or after spending a certain amount of time on the page.
- Variables in Google Tag Manager are "fields" that store information like the URL, the text of the link clicked, the device type, the cart value, and the product ID. Variables can be used both in trigger conditions and in the tags themselves to dynamically provide analytics tools with more accurate context about user behavior.
In practice, the cooperation of these three elements looks like this: first, you define a tag (e.g. sending the "Purchase" event to Google Analytics), then select a trigger (e.g. "Page View - only on /thank-you"), and in the tag settings, variables with order values, currency and transaction ID are included.
Thanks to this, each data packet sent is rich in information that can later be used to analyze the funnel and optimize campaign performance.
Data Layer, the foundation of precise tracking
At the heart of Google Tag Manager implementations is the data layer. It's simply an object (usually a JavaScript array) to which the website pushes structured business information, such as user login status, customer ID, product details, subscription type, or cart value.
Google Tag Manager reads this data and uses it in tags, rules, and variables, so you don't have to rely on fragile CSS selectors or a specific HTML structure that often changes with each front-end iteration.
A well-designed data layer standardizes the way information is transferred to various tools (Google Analytics, advertising systems, CRM), which increases the consistency and accuracy of measurement, and ultimately facilitates better targeting and reporting of marketing activities.
For e-commerce transactions, you can push order details to the dataLayer once, such as product ID, category, value, discount used, or user type – and then use them in parallel in the GA4 tag, Google Ads remarketing tag , and Meta pixel.
This means that all tools are based on the same, consistent set of data, which allows you to build more advanced audience segments and guide users more effectively through the subsequent stages of the sales funnel.
Assigning permissions in Google Tag Manager
In Google Tag Manager, we can grant permissions at both the account level and the container level. If we want a user to have access to all containers we've created, we should grant them account-level permissions.
There are two types of permissions available: Read Only (View Only) and View, Edit, and Manage. It's worth noting, however, that the latter type of permission doesn't allow editing within containers—it only allows viewing the settings selected for each container.
If we want to give the user the ability to edit the container or we do not want to give them access to the entire account, we should assign permissions at the container level.
In this case, we have three options:
- View Only,
- View and Edit
- and View, Edit, Delete & Publish.
This allows us to freely manage access to the account and maintain full control over the data contained therein.
Why is it worth having Google Tag Manager?
Well-organized tags in GTM and a structured data layer make implementing Consent Mode much easier. Because Google Tag Manager controls which tags can fire based on specific consent statuses (e.g., analytics_storage or ad_storage), it's much easier to comply with privacy regulations while maximizing the modeled conversion data that Consent Mode can retrieve despite the lack of consent from some users.
In practice, this means that the same mechanism of triggers and variables that you use to track events can control the behavior of tags depending on decisions from the cookie banner – thanks to this, the consent mode implemented by Google Tag Manager is more stable and produces better measurement results than manually "glued" solutions.
Making changes to the website easier
Sooner or later, most websites require updates or even more radical changes. And if we're changing the site's appearance, CMS, or template, it's necessary to migrate all scripts implemented directly in the code.
When there are a lot of them, it's easy to miss or paste them incorrectly, and it's simply tedious and time-consuming. Using Google Tag Manager makes this task easier – all you have to do is move the code to the new location within the container where you placed the site's tags to trigger all the scripts on that page.
That's why it's worth considering implementing GTM at the very beginning of your website - initially, it may seem that there are few scripts, making it an unnecessary complication, but their number can quickly grow and make any changes difficult.
Faster website loading
Each additional script in a page's code causes the site to load slightly slower, and the longer the page load time, the greater the chance that a user will become impatient. GTM makes it easier to keep your tags organized and easily remove unnecessary ones without adding unnecessary load to your site.
Using this solution, however, has another important advantage: it allows tags to load asynchronously. What does this actually mean? Simply put, faster-loading scripts don't have to wait for others, reducing the overall page load time.
Container Template Import Option
If we have a set of tags prepared and implemented on one page, we can easily import it into a new account. This saves us the time of creating a completely new script container when launching a second or subsequent website.
Ability to disable tags
If we implement scripts directly on the page, we must remove them completely if we do not want them to collect any more data.
However, we don't always want to opt for such a radical solution – sometimes we're unsure whether we'll need a particular tag in the future. Using Google Tag Manager, we can simply temporarily disable a given script.
Possibility to quickly check the correctness of the script implementation
Google Tag Manager provides preview and debugging capabilities, so you don't have to wait to see if a tag has been implemented correctly. Otherwise, you'd have to wait for the tag to collect data to ensure successful implementation.
Possibility to implement tags without the help of a programmer
When it comes to changing a website's code, most people prefer to seek help from a specialist to ensure that the change won't cause any problems with the website.
Having to involve a programmer in the implementation not only lengthens the process but can also incur additional costs. However, if we use Google Tag Manager, we can implement the new scripts ourselves, ensuring that we don't risk prolonged website downtime caused by the new tag.
If, as a result of our actions, the website begins to function incorrectly, simply revert to the container settings before the last script was implemented.
Summary
The above article covers the following topics:
- Google Tag Manager is a free tool that allows you to easily manage marketing and analytics scripts without having to edit the website's source code.
- GTM acts as an intermediary that allows you to manage tags, their firing rules, and variables using a single container code without interfering with the page structure.
- The data layer (dataLayer) is a JavaScript object that serves as a stable source of structured business information that GTM retrieves and passes to analytics tools regardless of changes to the page's HTML code.
- Google Tag Manager allows you to precisely manage access by granting read, edit or publish permissions separately at the account-wide level and for individual containers.
- Google Tag Manager improves analytics through faster page loading, easy consent management (Consent Mode), and the ability to independently implement and test scripts without involving a programmer.